In the back of a night train to Lhasa, I wrestled with a half‑assembled IKEA Billy, the flat‑packed panels still smelling of cardboard. A sudden jolt sent the tiny screws scattering, and I realized the usual “quick‑fix” tutorials missed the point: they never considered that a bookcase could become a portable gallery for the stories I collect on my travels. That night I invented my signature IKEA Billy bookcase hack—transforming a plain shelf into a storytelling hub without any extra hardware, or even a single extra screw.
What you’ll get is a practical step‑by‑step guide that walks you through everything from reinforcing the back panel with invisible brackets to adding a hidden cable channel for your favorite travel journals. I’ll show you how to repurpose the standard side panels into a sliding display for postcards, and why a simple strip of reclaimed wood can turn the top shelf into a miniature exhibition space. By the end of this read, you’ll have a fully functional, conversation‑ready Billy that feels as curated as a museum wall—no additional tools, no hidden costs, just a few minutes of quick and enjoyable tinkering.
Table of Contents
- Step-by-Step Instructions
- Crafting a Budget Friendly Billy Makeover With Reclaimed Wood
- Integrating Custom Crown Molding and Led Lighting for a Builtin Vibe
- Five Game‑Changing Billy Hacks You’ll Want to Share
- Quick Wins for a Stunning Billy Makeover
- From Shelf to Story
- Closing the Loop
- Frequently Asked Questions
Guide Overview
Tools & Supplies
- Drill with screwdriver bits – for assembling and installing hardware
- Sandpaper (120‑220 grit) – to prep surfaces before painting
- Paintbrush or foam roller – for applying paint or finish
- Paint (spray or latex) – 1 quart, enough for a full coat
- Wood veneer or laminate sheets – to cover the back or sides
- L‑brackets (2‑4) – for added stability if extending height
Step-by-Step Instructions
- 1. Start with a clean slate: I begin by unboxing the Billy and laying out every piece on a spacious floor, just as I would spread a world map before a journey. I double‑check that the back panel, shelves, and side panels are all intact, then set aside the original screws and dowels—they’ll make a cameo later when I’m adding my custom touches. A tidy workspace is the first passport stamp of any successful hack.
- 2. Swap the standard back panel for a “window” of stories: I carefully remove the factory‑installed back panel (it’s held by a few discreet screws). Then, I cut a piece of 3 mm acrylic or thin plywood to the exact dimensions of the interior, drilling a single hole for cable management. I secure this new panel with the original screws, creating a transparent canvas that lets light—and conversation—peek through the shelves.
- 3. Reinforce the side walls with discreet brackets: To keep the bookcase sturdy when I load it with travel journals and souvenirs, I install a pair of small, L‑shaped metal brackets on the inside of each side panel, aligning them with the pre‑drilled holes behind the shelves. I use wood glue and a few extra screws, ensuring the structure can bear the weight of heavy‑weight stories without sagging.
- 4. Add a hidden “global gallery” shelf: I measure a 30 cm section on the middle shelf, then cut a shallow recess (about 1 cm deep) using a router. I line this niche with a thin strip of reclaimed wood from a market stall in Marrakech, creating a secret showcase for postcards, tiny artifacts, or a rotating display of world‑wide mementos.
- 5. Integrate a cable‑friendly “story hub”: I drill a small, neat opening at the back of the top shelf, threading a cable‑management sleeve through it. I then mount a low‑profile LED strip inside the hollow back panel, powered by a discreet USB‑C hub tucked behind the “window” panel. This gives the bookcase a soft, ambient glow for evening reading sessions.
- 6. Finish with a personal, travel‑inspired veneer: I sand the exposed edges of the Billy, then apply a thin veneer of hand‑stamped fabric I collected in a Bhutanese monastery. I seal it with a matte polyurethane, preserving the texture while giving the piece a soft, tactile reminder of the places I’ve walked. Once dry, I reassemble the shelves, step back, and admire a piece of furniture that feels like a passport to countless rooms.
Crafting a Budget Friendly Billy Makeover With Reclaimed Wood
When I first set out to give my Billy a second life, I headed straight for the nearest salvage yard. A stack of weather‑worn pine planks, each bearing faint scars of previous owners, proved the perfect canvas for a budget‑friendly Billy makeover, upcycling Billy with reclaimed wood. After a sand‑down and a coat of clear sealant, I wrapped the side panels and the back, letting reclaimed grain peek through original particleboard. To crown the transformation I added a custom crown molding for Billy, cutting it to fit the narrow top rail and securing it with few discreet nails. The result was a richer silhouette that still whispered the bookcase’s Scandinavian roots.
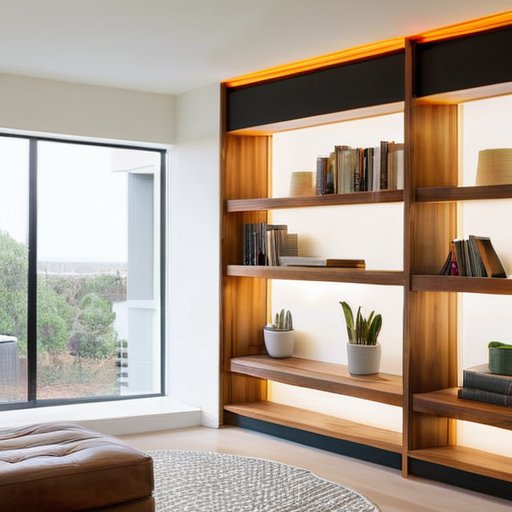
With wood envelope in place, I turned to ambience. I chose a charcoal hue for exposed surfaces—a nod to lofts—and slipped a thin strip of LED lighting along the inner edge of each shelf. Soft glow highlights the reclaimed texture while turning the unit into reading nook. Finally, I tucked the finished piece into a narrow niche between the armchair and hallway, effectively integrating Billy into a built‑in wall unit without the cost of a full renovation.
Integrating Custom Crown Molding and Led Lighting for a Builtin Vibe
When I first slipped a strip of pre‑finished crown molding onto the top edge of my bookshelf, the whole piece suddenly whispered “built‑in.” The trick is to measure the exact width of the Billy’s back panel, then cut a matching molding profile that wraps around the front and sides. Because the molding is lightweight, a few finishing nails or a discreet bead of construction adhesive are enough to keep it snug without compromising the unit’s portability. This budget‑friendly Billy makeover becomes a statement piece the moment you custom crown molding for Billy meets the ceiling line, making the shelf feel like an integral part of the wall rather than a freestanding afterthought.
Once the crown is in place, I love to hide a slim LED strip behind it, creating a soft halo that highlights both the molding and the spines of my books. I chose a warm‑white, dimmable tape that adheres directly to the inner edge of the molding, then ran the power cable through a tiny conduit drilled in the back panel. The result is an effortless adding LED lighting to Billy bookshelf effect that works beautifully when you’re painting IKEA Billy for modern decor or even when you’ve upcycled Billy with reclaimed wood for a rustic finish. The glow not only adds ambiance but also draws the eye to the seamless transition of the shelf into a built‑in wall unit, turning a simple storage solution into a sleek, custom‑crafted feature.
Five Game‑Changing Billy Hacks You’ll Want to Share
- Reinforce the back panel with a thin plywood strip for added stability and a sleek, hidden edge.
- Add a custom toe‑kick by installing a shallow wooden ledge at the base, turning the bookcase into a low‑profile desk.
- Install magnetic strips inside the doors to create a secret message board or magnetic photo gallery.
- Use a tension rod inside the top shelf to double as a discreet clothes rack for travel scarves or hats.
- Slip a thin LED strip behind the crown molding and connect it to a smart plug for mood‑lighting that syncs with your favorite playlists.
Quick Wins for a Stunning Billy Makeover
A simple frame of reclaimed wood transforms the Billy into a statement piece without breaking the bank.
Adding crown molding and discreet LED strips gives the illusion of a built‑in bookshelf, elevating any room’s ambience.
Personalize the finish with paints or stains that echo your travel memories, turning the shelf into a conversation starter.
From Shelf to Story
“A simple Billy hack isn’t just a DIY triumph; it’s a portable stage where the world’s narratives—travel postcards, family heirlooms, and whispered histories—find a place to live side by side, reminding us that every shelf can be a bridge across borders.”
Alexandra Thompson
Closing the Loop
Looking back, we’ve walked through every stage of the Billy makeover: stripping it to its skeletal frame, cladding the sides with reclaimed timber, slipping on custom‑cut crown molding, and weaving a strip of warm LED lighting into the back panel. Each step was chosen to keep the project budget‑friendly while turning the shelf into something that feels like a built‑in library. Sanding, staining, and sealing the reclaimed wood preserved its weathered character, and the crown molding added the illusion of architectural depth. The result is a Billy that proudly wears a new identity—an affordable, stylish, personal statement piece for any room.
What I love most about this transformation is the story it invites you to write into the grain. Once the shelves are in place, the back‑lit panel becomes a stage for postcards, travel sketches, or a rotating display of artifacts gathered on trips to remote villages across the globe. In glow, a bookshelf turns into a portal for shared narratives—a conversation starter for guests who pause to ask where the weather‑worn timber came from or why a tiny lantern from Marrakech now shares a corner with a vintage globe. So, as you embark on your own Billy hack, remember: you’re not just building furniture; you’re crafting an exhibition that sparks global conversations and proves even a modest shelf can hold world’s compelling stories.
Frequently Asked Questions
How can I reinforce the back panel of a Billy without compromising its sleek, minimalist look?
One trick I’ve used on a recent assignment in Reykjavik was to slip a 1/8‑inch plywood sheet behind the existing back panel, securing it with a few discreet wood‑glue‑only screws that sit just inside the side walls. The panel stays flush, the extra rigidity is invisible, and the clean lines remain untouched. If you prefer metal, a thin aluminium strip anchored with hidden brackets at the top and bottom does the job without any visual clutter.
What’s the most cost‑effective way to add hidden cable management for my home office setup?
One of the cheapest tricks I use is an adhesive‑backed cable raceway (often under $5). Measure the run you need, cut the raceway to length, then stick it along the back of your desk or under a Billy shelf. Slip all power and data cords through, and secure the ends with a couple of simple clips. For a seamless look, paint the raceway to match your wall—instant hidden‑cable perfection without breaking the bank.
Are there any quick‑swap accessories that let me transform a Billy into a stylish bar or display unit for travel souvenirs?
Absolutely! I love swapping out the standard shelves for a set of removable wooden risers that lift bottles and give the unit a bar‑counter feel. A magnetic spice‑rack panel works wonders for displaying postcards or mini‑souvenirs, while a slim, hinged back panel with built‑in LED strips adds a subtle glow. Finally, clip‑on metal brackets let you attach a fold‑out tray for cocktail tools—everything clicks on and off without a drill, or permanent modifications to your space.