I was halfway up a weather‑worn balcony in a tiny Sardinian village, the sea wind tugging at the unfinished cords in my hands, when a local artisan leaned over and whispered, “If you think macramé is just a hobby, you’ve never tried a wall hanging that tells a story.” That moment flipped the myth that macrame wall hanging for beginners demands a mountain of supplies or a master’s certificate. In truth, all you need is a sturdy branch, a handful of cord, and the willingness to let each knot echo the rhythm of a place you’ve never visited.
In this guide I’ll walk you through every knot that matters, from the forgiving square knot to the eye‑opening half‑hitch, and show you how to size your canvas without a calculator. You’ll get a printable material checklist, a quick‑reference knot chart, and the cultural anecdotes that turned a simple piece of rope into a conversation starter in my Delhi flat and a market stall in Oaxaca. By the end, you’ll have a no‑fluff, ready‑to‑hang masterpiece that feels as global as the vintage globes gathering dust on my bookshelf.
Table of Contents
Guide Overview
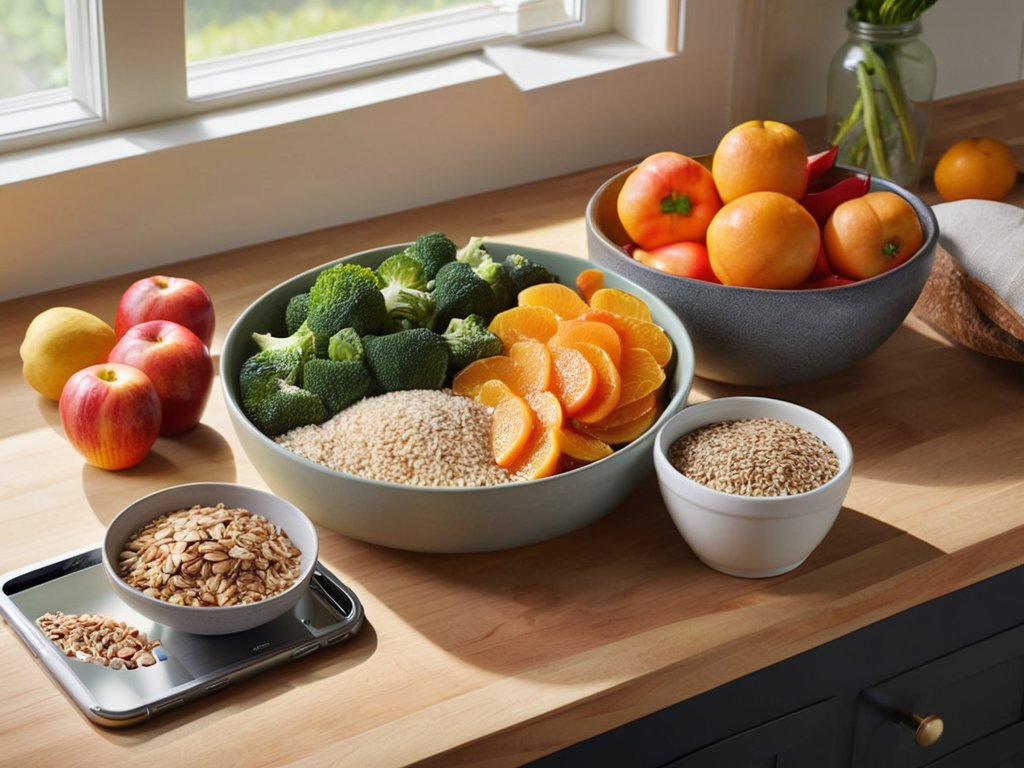
Tools & Supplies
- Scissors – sharp for clean cuts
- Measuring tape or ruler – to gauge cord lengths
- Wooden dowel or driftwood branch – serves as the hanging base
- Tape or small clamps – to hold the dowel while you work (optional)
- Macramé cord (3‑mm to 6‑mm thickness) – 200‑300 ft
- Wooden dowel (1‑2 in. diameter, 12‑18 in. length) – 1 piece
- Decorative beads or wooden charms – 3‑5 pieces (optional)
- Wall‑mounting hardware (hook, picture hanger, or command strips) – 1 set
Step-by-Step Instructions
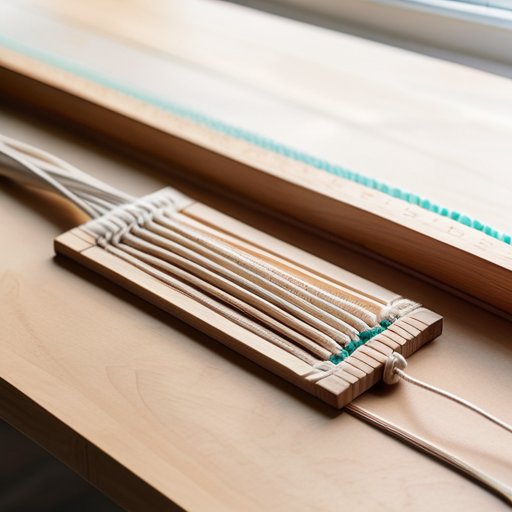
- 1. Gather my essentials – I start by laying out a sturdy wooden dowel (or an old branch if I’m feeling adventurous), a pair of scissors, a measuring tape, and, of course, my favorite cotton cord in a hue that reminds me of a sunrise over the Ganges. I also keep a small clipboard handy for jotting down any spontaneous design tweaks that pop up while I’m working.
- 2. Cut the cords – From my spool, I snip six lengths of cord, each about 120 cm long. The extra length gives me room to tie a neat fringe later, and I always double‑check that the ends are cleanly trimmed so the knots sit snugly.
- 3. Create the foundation knot – I fold each cord in half, forming a loop, and slide those loops onto the dowel. With a simple over‑hand knot, I secure all six cords together, spacing them evenly along the dowel. This “anchor” feels like the first handshake in a new friendship, grounding the piece before the patterns begin.
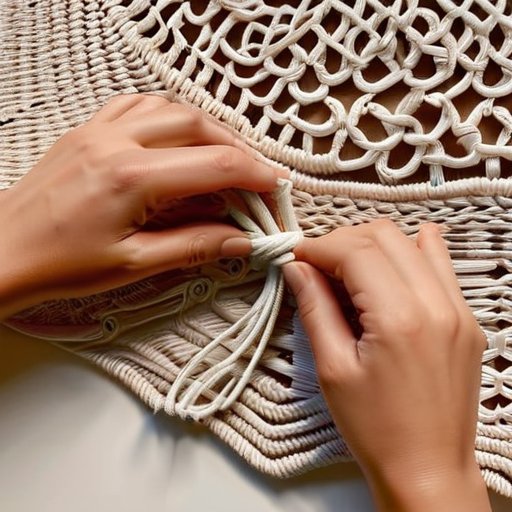
- 4. Weave the first row – I take two cords on the left and two on the right, leaving the middle pair as “spacers.” Using a half‑hitch knot, I loop the left pair around the right pair, pull tight, and repeat until I’ve covered the desired width. This repetitive motion is almost meditative, like tracing the lines of a map I’ve yet to explore.
- 5. Add texture with a square knot – Working with three cords at a time, I form a left‑hand square knot, then a right‑hand one, alternating to create a sturdy “grid.” I love the way each knot interlocks, reminding me of the intricate negotiations I once witnessed at a UN conference.
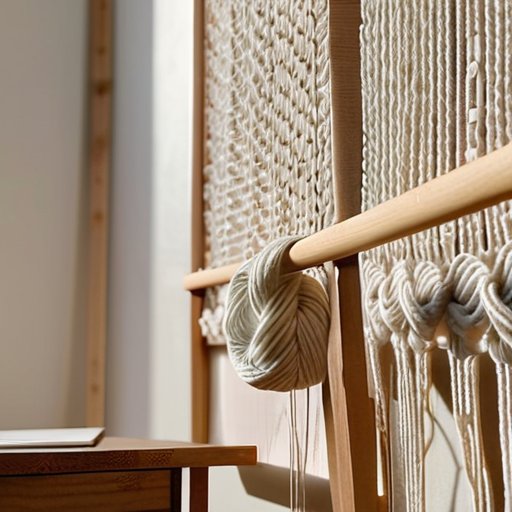
- 6. Finish with a fringe – Once the main body reaches my chosen length, I trim the hanging cords to about 15 cm, leaving a clean edge. I then braid the remaining strands together, securing the braid with a tiny knot at the base. The resulting fringe dances like a flag in the wind, ready to catch the eye of anyone passing by.
Unlocking the Basics Beginner Macrame Tutorials and Knot Essentials
When I first unpacked my cotton cord macrame supplies—a skein of soft 3‑mm twine, a small wooden dowel, and a stack of glossy PDFs—I realized that the real magic begins before the first knot is even tied. A quick scroll through a few beginner macrame tutorials can turn that tangled skein into a confidence‑boosting warm‑up. I like to pause a video at the moment the instructor demonstrates a basic square knot, then rewind and practice the motion with my own cord, feeling the tension settle just right. If you’re unsure about the rhythm, print out a step by step macrame tutorial sheet and trace the loop outlines with a pencil; the visual cue helps you internalize how to tie macrame knots without staring at a screen for hours.
Once you’ve mastered the foundational knots, the real joy is exploring the treasure trove of boho macrame wall art ideas that online communities share. A favorite for easy evenings is a “chevron‑strip” design that only requires a handful of half‑hitches and a simple repeat pattern—perfect for a quick easy macrame projects for home decor win. And don’t overlook the value of a downloadable macrame wall hanging patterns pdf: it gives you a ready‑made blueprint while you experiment with cord thickness, fringe length, and even subtle color shifts. By treating each practice session as a mini‑workshop, you’ll find that the learning curve feels less like a climb and more like a leisurely stroll through a market of endless possibilities.
From Pdf Patterns to Boho Art Easy Projects for Home Decor
I’ve found the quickest way to turn a blank wall into a boho‑ready centerpiece is to download a macrame wall hanging patterns pdf that fits your space. Most free libraries pair the PDF with a short video showing the how to tie macrame knots you’ll need, turning the guide into a visual cheat sheet instead of a cryptic diagram. I start with a 3‑mm cotton cord macrame supplies kit—soft enough for a gentle drape yet sturdy enough for a plant holder or fairy lights. Once the cord is cut, each knot becomes a tiny step toward a piece that feels both handmade and intentionally curated.
If you’re searching for inspiration, scroll through a few boho macrame wall art ideas on Instagram or Pinterest and bookmark the ones that match your palette. For a weekend project, try the “half‑sheet fringe” design I love: it needs only a single row of square knots and a couple of loops, making it the perfect easy macrame projects for home decor starter. Follow a step by step macrame tutorial video, pause at each knot, and you’ll be surprised how the wall looks lived‑in and luxe.
Knotting Your Way to a Boho Statement
- Start with a sturdy, natural‑fiber cord and a simple knot library—mastering the square knot and half‑hitch will unlock most beginner designs.
- Measure twice, cut once: determine your desired width and length before you begin, then add a few extra inches for tension and trimming.
- Use a small wooden dowel or reclaimed branch as a backing; it gives your piece structure and a rustic touch that’s instantly Instagram‑ready.
- Keep your tension consistent—pull each knot snug but not overtight, so the fabric drapes gracefully rather than looking like a rope ladder.
- Finish with a protective sealant or a light spray of fabric stiffener to preserve the fibers and make hanging your masterpiece a breeze.
Key Takeaways
Start with a solid foundation knot and maintain consistent tension for a neat finish.
Master the basic square knot and half‑hitch before tackling more intricate patterns.
Secure your piece with a durable hanging loop to showcase your macramé art proudly.
Tying Threads, Telling Stories
“In the gentle pull of each knot, a beginner discovers not just a decorative piece, but a quiet conversation between hand, heart, and the world beyond the loom.”
Alexandra Thompson
Wrapping It All Up
Looking back on the journey from a tangled skein to a finished wall piece, we’ve covered the practical compass that turns a curious beginner into a confident knot‑artist. First, we chose a sturdy yet forgiving cotton rope and measured it against the length of the wall we wanted to dress, because a good foundation prevents the whole design from drifting. Next, we walked through the essential knots—the slip knot, square knot, and half‑hitch—practicing each until the loops felt as familiar as a passport stamp. We then layered those knots into a simple yet versatile pattern, consulted a PDF tutorial for visual guidance, and finished with a clean fringe that lets the piece breathe. Along the way, we reminded ourselves to keep tension even, trim excess rope neatly, and, most importantly, to let a personal touch—a splash of color or a tucked‑in bead—make the work truly our own.
Beyond the aesthetics, each macramé wall hanging becomes an ambassador of patience and conversation—a reminder that a single strand can bridge continents when we tie it with intention. I invite you to hang your first piece in a sunlit corner, share the next knot with a friend, and let the texture of the fibers echo the places you’ve visited. In the end, the reward is not just a decorative panel but your own story woven into the fabric of home.
Frequently Asked Questions
What type of cord (material, thickness, and color) should I choose for my first macramé wall hanging, and where can I source sustainable options?
When I first set out for a beginner macramé piece, I learned that the rope you pick becomes the story’s backbone. For a sturdy yet forgiving start, choose 100 % organic cotton or hemp cord, about 3–4 mm thick; it’s easy to knot and holds its shape. Natural ivory or earth tones blend beautifully, while low‑impact vegetable dyes add a subtle pop. Look for fair‑trade Etsy shops, the Macramé Store’s “Eco‑Line,” or local artisan markets that champion zero‑waste fibers.
How do I decide on the right size and hanging hardware for a macramé piece that fits both a small apartment nook and a larger living‑room wall?
First, measure the space. In a nook, a 12‑to‑18‑inch width keeps the piece intimate; for a living‑room wall, aim for 30‑40 inches to make a statement without overwhelming the room. Choose a wooden dowel or reclaimed branch that’s at least a half‑inch thicker than your finished width, then anchor it with two picture‑hanging hooks or an S‑hook and a wall anchor rated for the weight. A test—hold the hanging at eye level—helps you visualise the final look.
Can I incorporate reclaimed or culturally significant fibers into my project without compromising the structural integrity of the knots?
Absolutely—you can weave reclaimed or culturally rich fibers into a sturdy macramé piece, but a few tweaks help keep those knots solid. Start by selecting fibers that are clean, evenly sized, and free of excessive fraying; a gentle hand‑wash or a brief tumble‑dry can tame any rough edges. When you’re knotting, maintain consistent tension and consider using a slightly larger knot size or a reinforcing “half‑hitch” on the first few loops. A quick test‑tug before you finish will confirm that your beautiful, meaningful yarn holds up just as well as any commercial cord.